Introduction: The Rise of the “Black Aluminum” Era
Composite Inspection has become the definitive challenge of modern aviation maintenance. The age of undisputed aluminum dominance in aerospace manufacturing is over. Modern aviation has decisively entered the “Black Aluminum” era, where advanced composite materials are no longer a novelty but the structural backbone of next-generation aircraft.
With the Boeing 787 Dreamliner comprising over 50% composite by weight and the Airbus A350 XWB built with a similar carbon-fiber-intensive design, the daily reality for the aviation NDT technician has undergone a paradigm shift. Composite Inspection is no longer an optional skill; it is a requirement.
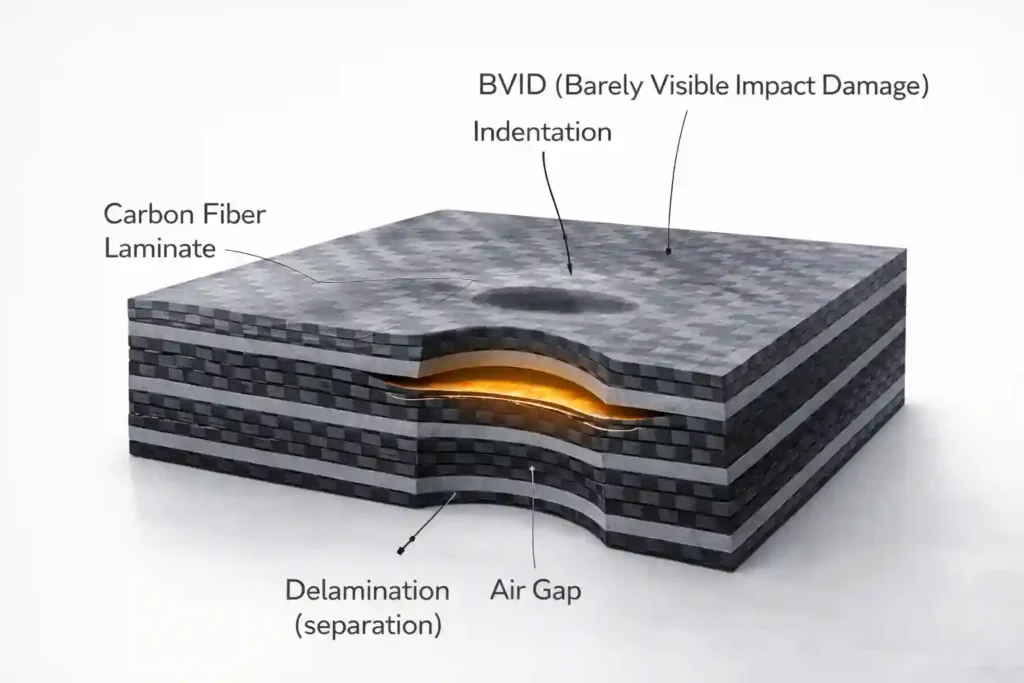
Carbon Fiber Reinforced Polymer (CFRP) laminates and Nomex/Aluminum Honeycomb Sandwich structures deliver unparalleled strength-to-weight ratios, enabling unprecedented fuel efficiency and design flexibility. However, these remarkable materials introduce a new and insidious challenge for maintenance and quality assurance: Hidden Damage. Unlike isotropic metals, which yield and dent visibly upon impact, anisotropic composites are prone to Barely Visible Impact Damage (BVID). A seemingly minor event—a dropped tool on a wing, a service vehicle bump—can leave the pristine gel coat surface unmarked while shattering the internal fiber layers like fine glass, creating a critical but invisible weakness.
In this guide, we navigate the specialized, evolving world of Composite Inspection. We move far beyond the rudimentary coin tap to explore the physics of anisotropic wave propagation, master the art of bond testing, leverage the power of Ultrasonic Phased Array (PAUT), and confront the persistent challenge of detecting moisture within honeycomb cores. This is the essential knowledge for safeguarding the integrity of modern and future aircraft.
Resources like the CMH-17 (Composite Materials Handbook) provide authoritative data on testing and structural analysis.
Primary Keywords: Composite Inspection, Aviation Composites NDT, Carbon Fiber Inspection, Honeycomb Bond Testing, Barely Visible Impact Damage (BVID), Ultrasonic Phased Array Composites, Thermography NDT, Delamination Detection.
1: The Composite Challenge: Understanding Anisotropy & Layered Structures
Inspecting composites is fundamentally more complex than inspecting homogeneous metals. This complexity stems from two core material characteristics:
1. Anisotropy: The Direction-Dependent Property
- Metals (Isotropic): Sound waves (and material properties) travel at the same velocity in all directions. An ultrasonic signal behaves predictably.
- Composites (Anisotropic): Carbon fiber laminates are built from layers (plies) of unidirectional fibers or woven fabric embedded in resin. Acoustic velocity and attenuation depend heavily on the direction of wave travel relative to the fiber orientation. A wave traveling along the fibers moves faster and with less attenuation than one traveling across them. This anisotropy complicates ultrasonic inspection, requiring specialized probe designs and sophisticated data analysis to accurately locate and size defects.
2. The Layered & Sandwich Reality
- Complex Laminate Architecture: A single CFRP component may consist of 50+ individual plies, each oriented at a specific angle (e.g., 0°, +45°, -45°, 90°) to optimize strength. A critical defect, like a delamination, can exist as a planar separation between any two of these layers, often with no surface expression.
- Sandwich Construction: A vast array of aircraft structures—flaps, ailerons, radomes, floor panels—utilize a sandwich design: two thin, stiff composite skins bonded to a lightweight honeycomb core (made of Nomex paper or aluminum foil). The primary failure mode here is not within the skins or core, but at the adhesive bond line connecting them.
2: The Defect Bestiary: Delamination, Disbond, and Moisture Ingress
The failure modes in composites are distinct from those in metals. The NDT technician is trained to hunt for three primary enemies:

1. Delamination
- What it is: The separation of two adjacent plies within a solid laminate. It is a planar, air-filled discontinuity.
- Primary Cause: Low-velocity impact (BVID), manufacturing imperfections (improper cure, foreign object inclusion), or excessive shear stress.
- The Risk: Dramatically reduces the laminate’s compressive strength and stiffness. Under load, the delaminated skin can buckle internally, leading to rapid, catastrophic growth.
2. Disbond (or Debond)
- What it is: The failure of the adhesive bond between a composite skin and its honeycomb core (or between two co-cured laminate sections). It represents a complete loss of structural synergy.
- Primary Cause: Adhesive application error, contamination during bonding, or—most critically—water ingress. Water trapped in the core can freeze at altitude, expanding and mechanically prying the skin away from the core.
- The Risk: Can lead to large-scale skin separation, causing control surface flutter, loss of aerodynamic smoothness, or total structural failure.
3. Water/Moisture Ingress
- What it is: The absorption of water into the composite matrix (ingression) or, more critically, the entrapment of liquid water within the honeycomb core cells.
- Primary Cause: Sealant failure around fasteners or edges, microcracking from impact or fatigue.
- The Risk: Core Corrosion (in aluminum honeycomb), Frost Damage (expansion during freezing), and promotion of disbond growth. It also adds significant, uncontrolled weight.
3: The Inspection Arsenal: From Simple Taps to Advanced Imaging
A composite inspector’s toolkit is diverse, deploying methods ranging from artisanal to highly technological.
Method 1: The Acoustic Tap Test (The Universal Screen)
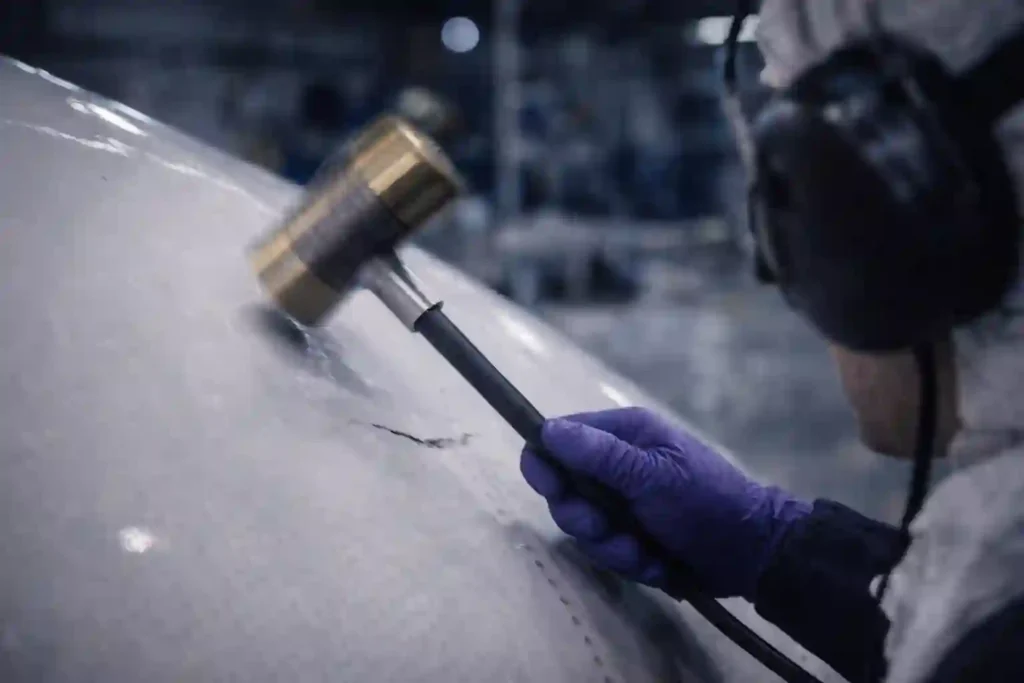
Despite technological advances, the tap test remains a ubiquitous, rapid screening tool.
- The Physics: A lightweight hammer or coin taps the surface. The resulting sound is a function of local stiffness.
- Sound Interpretation:
- Solid, Well-Bonded Structure: Produces a crisp, high-pitched “ring” or “click” (high stiffness, low damping).
- Area with Disbond/Delamination: Produces a dull, low-pitched “thud” or “dead” sound (reduced local stiffness, higher damping as the loose layer absorbs energy).
- Advantages: Extremely fast, portable, cost-free, and effective for large-area screening.
- Limitations: Highly subjective, dependent on technician experience and hearing. Useless in noisy environments. Cannot detect deep defects or provide quantitative data for repair planning.

Method 2: Ultrasonic Bond Testing (The Specialist’s Tool)
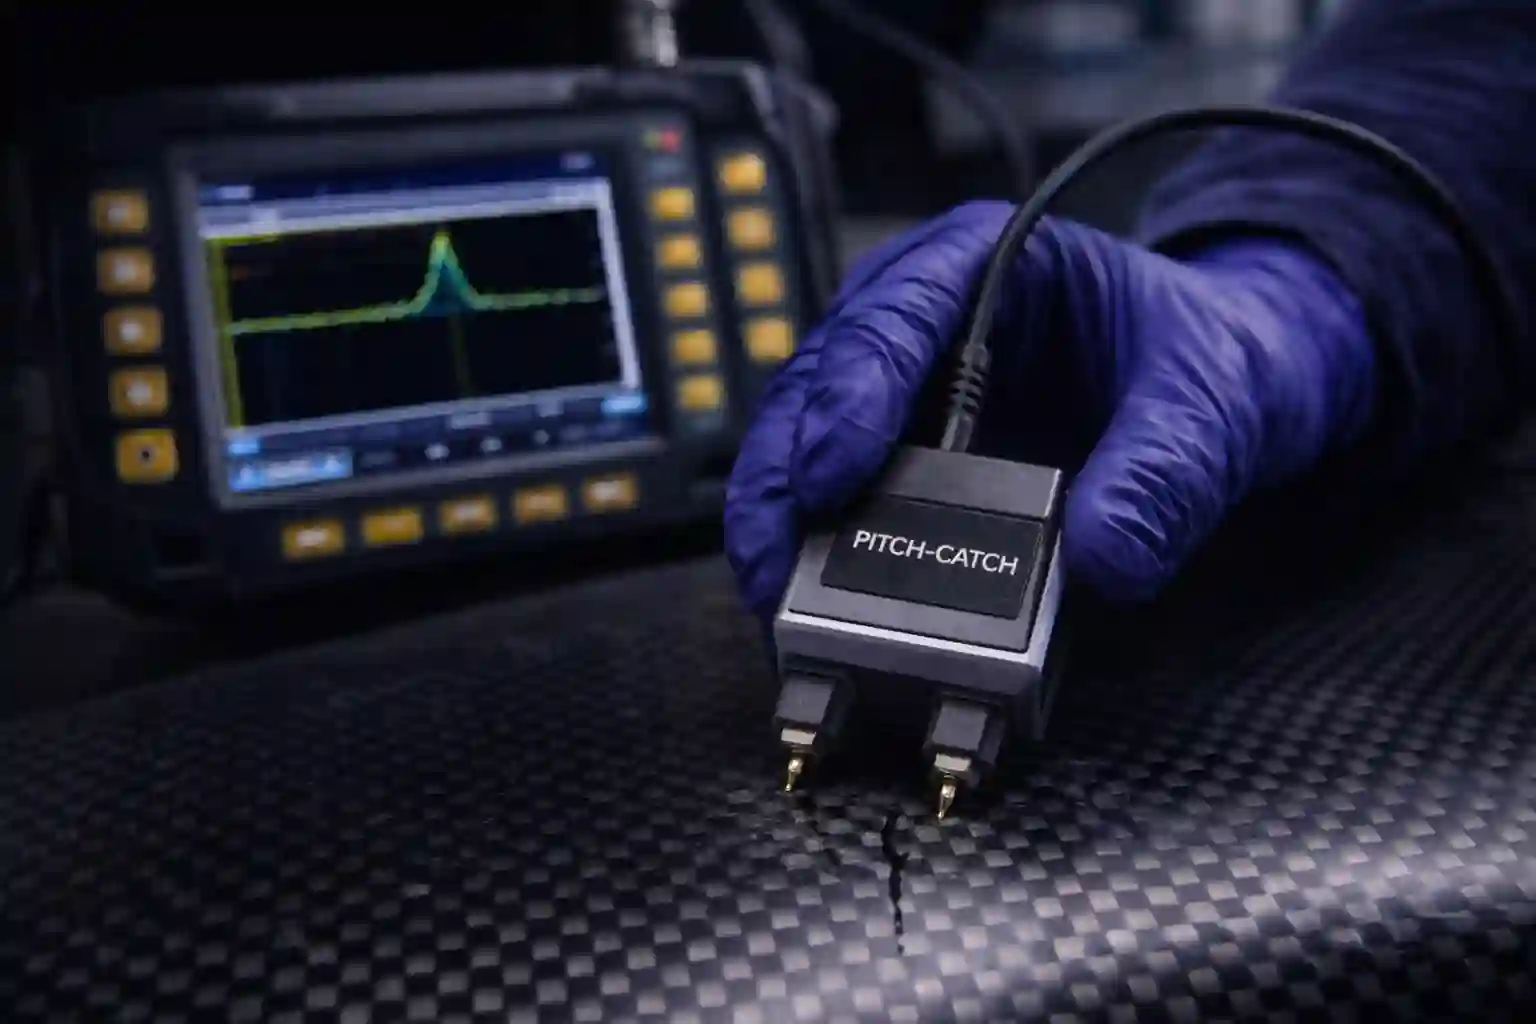
When a tap test indicates a problem or for critical, scheduled inspections, Ultrasonic Bond Testers (e.g., “BondMaster”) are deployed.
- Principle: Uses low-frequency ultrasonic waves to measure the mechanical impedance (stiffness) of the structure.
- Key Modes:
- Resonance Testing: A single-element probe vibrates at a specific frequency. A disbond changes the resonant characteristics, altering the signal amplitude/phase on the instrument display.
- Pitch-Catch (Through-Transmission): Uses two crystals: one transmits, one receives. A disbond or delamination blocks or attenuates the sound wave traveling between them. Ideal for honeycomb sandwich panels.
- Mechanical Impedance Analysis (MIA): Provides a direct point-by-point quantitative measurement of local stiffness, excellent for mapping bond integrity and detecting crushed core.
Method 3: Phased Array Ultrasonic Testing (PAUT) – For Laminate Mapping
For thick, complex laminates (e.g., wing skins, fuselage sections), PAUT is the gold standard for detailed defect characterization.
- The Advantage: A probe with 64-128 elements can electronically steer, focus, and sweep an ultrasonic beam. This allows for the creation of a full-volume C-Scan image without moving the probe.
- The Result: Provides a precise, color-coded top-down map of the internal structure. Technicians and engineers can accurately measure the length, width, and depth of delaminations, informing critical repair scarfing plans and damage tolerance analysis.
Method 4: Advanced Optical Methods: Thermography & Shearography
These are the cutting-edge, non-contact methods for rapid, full-field inspection.
- Pulsed Thermography (PT):
- Process: A short, high-energy pulse of light (or heat) heats the surface. An infrared camera records the cooling transient.
- Defect Detection: Air-filled defects (delaminations, disbonds) act as thermal barriers, causing the surface above them to cool more slowly, appearing as “hot spots” in the IR sequence.
- Best For: Rapid inspection of large, complex-curvature parts.
- Shearography (Laser Speckle Interferometry):
- Process: Uses a laser to illuminate the surface. The part is slightly stressed (via vacuum, thermal, or pressure change). A shearing camera measures microscopic surface displacement (strain).
- Defect Detection: Areas with subsurface defects deform more under stress, creating distinctive “butterfly” or “bullseye” fringe patterns in the interferometric image.
- Best For: Detecting near-surface disbonds and delaminations in sandwich structures; highly sensitive and quantitative.
4: Application-Specific Strategies: Matching the Method to the Mission
| Component / Defect Target | Primary Inspection Method(s) | Reasoning |
|---|---|---|
| Large Sandwich Panels (Flaps, Ailerons) | Tap Test (screening) → Ultrasonic Bond Tester (Pitch-Catch) (verification) | Fast screening for global defects, followed by quantitative bond line verification. |
| Thick Solid Laminates (Wing Skins, Spars) | Phased Array UT (PAUT) | Provides detailed volumetric C-Scan mapping for accurate delamination sizing and depth determination. |
| Water Ingress in Honeycomb | X-Ray Radiography or Pulsed Thermography | X-ray shows trapped water as foggy patches. Thermography shows thermal anomalies as water has different heat capacity. |
| Near-Surface Disbonds & BVID | Shearography or Pulsed Thermography | Full-field, non-contact methods ideal for detecting shallow planar defects with high sensitivity. |
| Production & High-Volume Inspection | Automated PAUT Scanners or Robotic Thermography | Provides fast, consistent, digitally archived results for quality control. |
5: The Career Path: Becoming a Composite NDT Specialist
The shift to composite airframes has created a high-demand niche for specialized inspectors.
- Skill Gap: Traditional Level 2 technicians certified in UT, ET, and PT often lack the specific theoretical and practical knowledge for composite material behavior and advanced inspection techniques.
- Certification Evolution: Standards like NAS 410 and EN 4179 are increasingly emphasizing “Composites/Bonded Structure” as a distinct specialty module. Dedicated training and certification are becoming mandatory.
- Career Trajectory: A Composite NDT Specialist commands a premium. Career progression leads to roles as a Level 3 in Composites, a Repair Design Approver (using NDT data to sign off on complex scarf repairs), or a Applications Engineer for advanced NDT equipment manufacturers.
Advantages & Limitations of Composite NDT
- Advantages: A suite of methods exists for every application; advanced methods provide rich, quantifiable data; critical for maintaining next-generation aircraft safety.
- Limitations: No single method is universally perfect; equipment for PAUT, Thermography, and Shearography is capital-intensive; requires significant theoretical understanding and specialized training; interpretation is often more complex than for metals.
Conclusion: Guardians of the Black Aluminum Sky
Composite inspection represents the dynamic frontier of modern aviation NDT. As aircraft become lighter, stronger, and more efficient, the structures we must certify become exponentially more complex to interrogate. The modern composite technician is a hybrid expert—part physicist, part materials scientist, and part master of sophisticated technology—whether wielding a simple tap hammer to listen for a structural whisper or programming a robotic arm to perform a laser shearography scan.
The goal, however, remains timeless and paramount: to ensure that the “black aluminum” birds of today and tomorrow possess not just the revolutionary performance promised by their materials, but the absolute, verified structural integrity that is the non-negotiable foundation of flight safety. In the composite age, seeing the unseen is not just a skill; it is an indispensable safeguard.


