Introduction: The Guardian of Aviation’s Steel Skeleton
In the specialized ecosystem of aviation Non-Destructive Testing (NDT), each technique claims its sovereign domain. Liquid Penetrant Testing governs non-porous surfaces, Eddy Current Testing patrols aluminum skins, and Ultrasonic Testing probes deep internal structures. Yet, for the heavy-duty, high-strength steel components that endure the brutal forces of flight—landing gear struts, engine pylon mounts, wing attachment fittings, and critical fasteners—one method reigns supreme: Magnetic Particle Testing (MT), universally known as Magnetic Particle Inspection (MPI).
While modern airframes increasingly leverage composites and aluminum alloys, ferromagnetic steels remain irreplaceable at critical load-bearing junctures. These components face relentless cyclic stress where microscopic fatigue cracks can initiate and propagate. A flaw in these parts isn’t merely a maintenance concern; it constitutes an immediate safety-of-flight emergency.
This comprehensive guide delves beyond basic principles. We explore the fundamental physics of “flux leakage,” explain why paint stripping is a non-negotiable safety protocol, detail the critical differences between magnetization techniques, and reveal why the final demagnetization step is the most frequently overlooked yet essential safety procedure in the entire process.
Primary Keywords: Magnetic Particle Testing, MPI Aviation, Magnetic Particle Testing, Magnetic Particle Inspection, Aircraft Landing Gear Inspection, Flux Leakage NDT, Ferromagnetic Steel Testing, Aviation NDT Method
1: The Physics of Detection: Mastering Magnetic Flux Leakage
To truly master Magnetic Particle Testing, one must first command the principles of electromagnetism. MT’s detection capability hinges entirely on the phenomenon of Magnetic Flux Leakage.

The Fundamental Concept
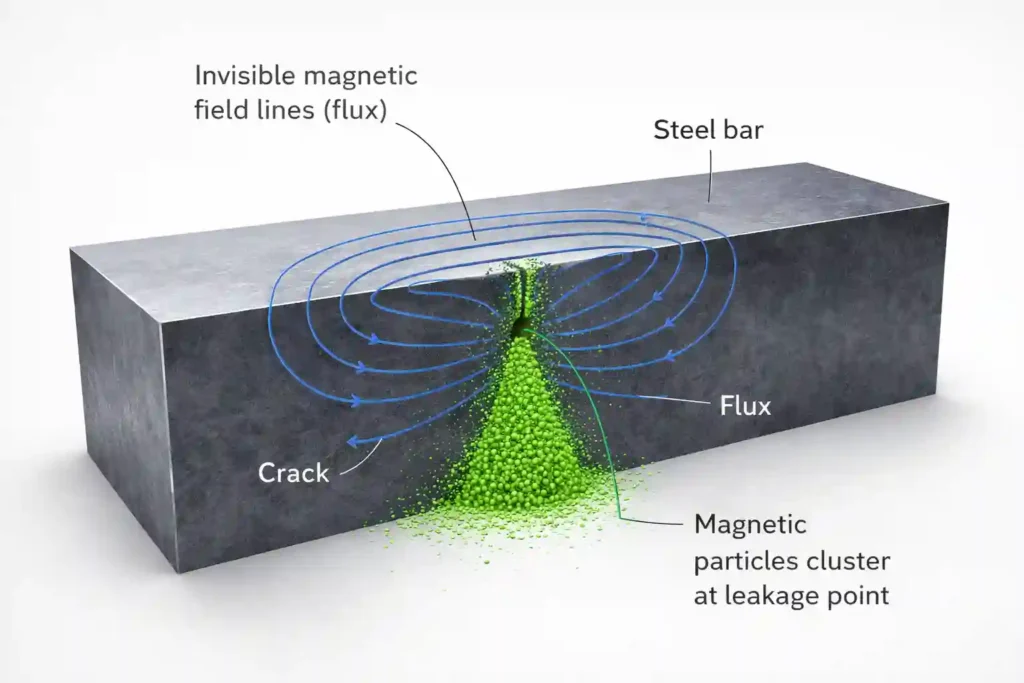
Visualize a ferromagnetic steel component—like a landing gear axle—that has been magnetized. An internal magnetic flux field (comprised of invisible lines of magnetic force) is established within the part.
- Continuity in Sound Material: In a defect-free, homogenous component, these magnetic flux lines flow through the material in a smooth, continuous, and undisturbed path.
- Disruption by a Defect: When a discontinuity—such as a fatigue crack, slag inclusion, or forging lap—intercepts this path, it presents a barrier. Since the flaw (typically air-filled) has a much lower magnetic permeability than the surrounding steel, it disrupts the easy flow of magnetic flux.
- The Leakage Field: Magnetic flux prefers the path of least resistance (high-permeability steel). Unable to flow through the air gap of the crack, the flux lines “leak” or “bulge” out of the component’s surface to bridge the discontinuity. This creates a local, external magnetic pole at each edge of the crack.
- Forming the Indication: When finely milled, ferromagnetic particles (often coated with fluorescent dye) are applied to the area, they are powerfully attracted to these magnetic poles. The particles cluster and align along the leakage field, piling up to form a visible, precise outline of the defect directly on the component’s surface.
The Subsurface Advantage
A key differentiator from Liquid Penetrant Testing is MT’s ability to detect subsurface flaws. Since the magnetic field penetrates the material, defects lying slightly below the surface (e.g., under a chrome plating layer or within a weld) can still create a measurable flux leakage field. However, sensitivity decreases rapidly with depth; MT is predominantly a surface and near-surface inspection method.
2: The Aviation MPI Process: A Rigorous 6-Stage Protocol
In aviation maintenance and manufacturing, MPI is performed under stringent standards like ASTM E1444 and ASTM E3024 for wet fluorescent MT. A valid inspection is a non-negotiable, sequential six-stage protocol.
Stage 1: Surface Preparation – The Foundation of Fidelity
This step is often the most labor-intensive but is absolutely critical for reliable results.
- The Paint Dilemma: Unlike Eddy Current, MT generally cannot inspect through paint. The coating creates a physical “lift-off” distance, drastically weakening the leakage field’s strength at the surface and trapping particles in the texture, leading to false indications. Paint removal to bare metal is typically mandatory.
- Cleaning Imperative: All oil, grease, dirt, and loose scale must be removed via degreasing solvents. Contaminants can both mask defects and cause non-relevant particle buildup.
Stage 2: Magnetization – Inducing the Detectable Field
This is the technical core of the inspection. The inspector must induce a magnetic field of adequate strength and correct orientation.
- The Golden Rule of Orientation: To create a strong leakage field, the induced magnetic field must be oriented as perpendicular (90°) as possible to the major axis of the suspected defect. Since crack orientation is unknown, aviation standards require magnetization in two essentially perpendicular directions (typically longitudinal and circular) for 100% coverage.
- Methods: This is achieved using direct current flow (for circular magnetization detecting longitudinal cracks) or by placing the part in a solenoid coil (for longitudinal magnetization detecting transverse cracks).
Stage 3: Particle Application – The Wet Fluorescent Standard
Aerospace mandates the use of Wet Fluorescent Magnetic Particles for their superior sensitivity and contrast.
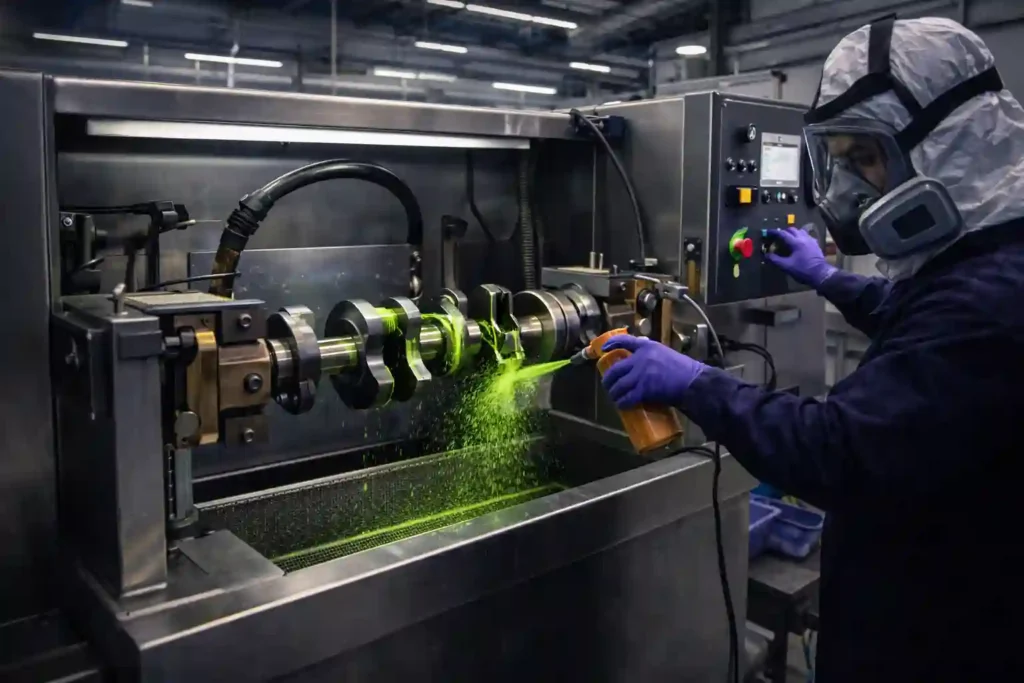
- The Bath: Particles are suspended in a liquid carrier—either a light petroleum-based oil or a water-based vehicle with anti-corrosion additives. The bath is continuously agitated to maintain suspension.
- Application Technique: The continuous method is standard in aviation: particles are applied while the magnetizing current is flowing. This ensures the particles are mobilized and attracted to the dynamic leakage field as it forms, offering maximum sensitivity for fine fatigue cracks.
Stage 4: Inspection & Interpretation – The Level 2’s Domain
Inspection is conducted under darkened conditions using high-intensity UV-A (365 nm) black lights, similar to PT.
- The Indication: A tight, sharp, bright green-yellow line signifies a crack. A fuzzy, diffuse cloud may indicate a subsurface inclusion.
- The Art of Interpretation: A certified Level 2 or Level 3 technician must differentiate relevant defect indications from non-relevant indications caused by magnetic writing, sharp geometry changes (thread roots, keyways), or banding in the material. This requires extensive training and practical experience.
Stage 5: Demagnetization – The Critical Post-Inspection Safeguard
Failure to demagnetize is a cardinal sin in aviation MPI. Post-inspection, components retain potentially strong residual magnetism.
- The Hazards: A magnetized landing gear component can:
- Attract ferrous wear debris (metal chips, filings), acting as a grinding paste that accelerates bearing and seal wear.
- Interfere with nearby aircraft compass systems and sensitive avionics sensors.
- Cause arc welding issues during subsequent repairs.
- The Process: Demagnetization is achieved by subjecting the part to a reversing, rapidly decaying magnetic field, typically by passing it through an AC coil or using an AC yoke while slowly withdrawing the part.
Stage 6: Post-Cleaning & Protection
The residual particle bath must be thoroughly cleaned from the component. Since the protective paint was stripped, a temporary corrosion preventive must be applied immediately to prevent flash rusting before the final painting process.
3: MPI Equipment: From Portable Yokes to Stationary Systems
The choice of equipment is dictated by part size, location, and inspection requirements.

1. Electromagnetic Yokes (Portable “Legs”)
- Application: The workhorse for on-aircraft, in-situ inspections. Ideal for inspecting landing gear, engine mounts, and welded frames without component removal.
- Operation: The yoke creates a localized longitudinal magnetic field between its two poles. The inspector must perform two inspections at each location, with the yoke oriented 90° apart, to check for cracks in all directions.
- Pros: Portable, versatile, and relatively inexpensive.
2. Stationary Bench Units (The Industry Standard for MRO)
Found in overhaul and manufacturing facilities, these machines offer superior control, power, and repeatability.
- Circular Magnetization (“Head Shot”): High-amperage direct current is passed directly through the part clamped between two contact heads. It induces a circular field for detecting longitudinal defects. Risk: Poor contact can cause arc burns, damaging the part surface.
- Longitudinal Magnetization (“Coil Shot”): The part is placed inside a large, fixed solenoid coil. When energized, the coil creates a strong longitudinal field within the part, ideal for detecting transverse defects.
3. Multi-Directional Magnetization Units
The pinnacle of bench equipment, these advanced units use vector-based current switching to induce a rotating magnetic field in the part, achieving near-omnidirectional sensitivity in a single “shot.” They are used for the most critical components like turbine engine shafts.
4: Advantages, Limitations & Career Pathways in Aviation MPI
Advantages of Magnetic Particle Testing
- Subsurface Detection Capability: Can find flaws lying slightly beneath the surface, a key advantage over PT.
- Immediate Results & High Speed: Provides real-time indications; no dwell or development time is required.
- Excellent Sensitivity: Properly calibrated, it can detect exceedingly fine, hairline fatigue cracks.
- Rugged & Relatively Forgiving: Less sensitive to minor surface contamination than penetrant testing (though clean surfaces are still vital).
- Direct Visualization: The indication forms directly on the defect location, showing its length, shape, and orientation.
Limitations of Magnetic Particle Testing
- Material Restriction: Exclusively for ferromagnetic materials (iron, steel, nickel, cobalt). Completely ineffective on aluminum, titanium, magnesium, or composites.
- Orientation Dependency: Requires magnetization in (at least) two directions for full coverage.
- Surface Preparation Burden: Paint stripping is often required, adding significant time and cost.
- Part Geometry Challenges: Complex shapes can distort magnetic fields, creating “dead zones” that require specialized techniques.
- Electrical Hazard: High-amperage direct contact methods pose a risk of arcing and burns.
Career Progression: The Path to MT Expertise
Magnetic Particle Testing is a foundational certification, often pursued alongside Liquid Penetrant.
- Level 1 Technician: Performs inspections under the direct supervision of a Level 2, following written instructions.
- Level 2 Technician (The Core Practitioner): Calibrates equipment, establishes techniques (calculating required amperage based on part dimensions: I = (30-45) x D for circular mag), interprets indications, and certifies inspections. Requires deep knowledge of electricity (AC, HWDC, FWDC) and magnetic theory.
- Level 3 Technician: Develops and qualifies inspection procedures, oversees the entire NDT program, and acts as the ultimate technical authority.
Conclusion: The Unwavering Sentinel for Aviation’s Critical Steel
While carbon fiber composites and titanium alloys capture the imagination of modern aerospace design, the aircraft’s fundamental skeleton—the components that absorb landing impacts, suspend engines, and transfer primary flight loads—remains forged from ultra-high-strength steel. For these irreplaceable guardians of structural integrity, Magnetic Particle Testing stands as the undisputed, non-negotiable inspection standard.
In 2026, despite trends toward automation and digital NDT, the safety of flight still relies profoundly on the calibrated skill of the MPI technician: the careful placement of the yoke, the precise calculation of amperage, and the expert eye discerning a fatal fatigue crack from a benign indication under the glow of the black light. It is a discipline where a deep respect for physics meets unwavering procedural rigor, ensuring that the steel heart of every aircraft remains sound for every takeoff and every landing.


